
Snake Wars Speed Challenge: Secrets to Rapid Growth
Want to become the biggest snake in record time? Master the art of rapid growth with these advanced speed strategies.
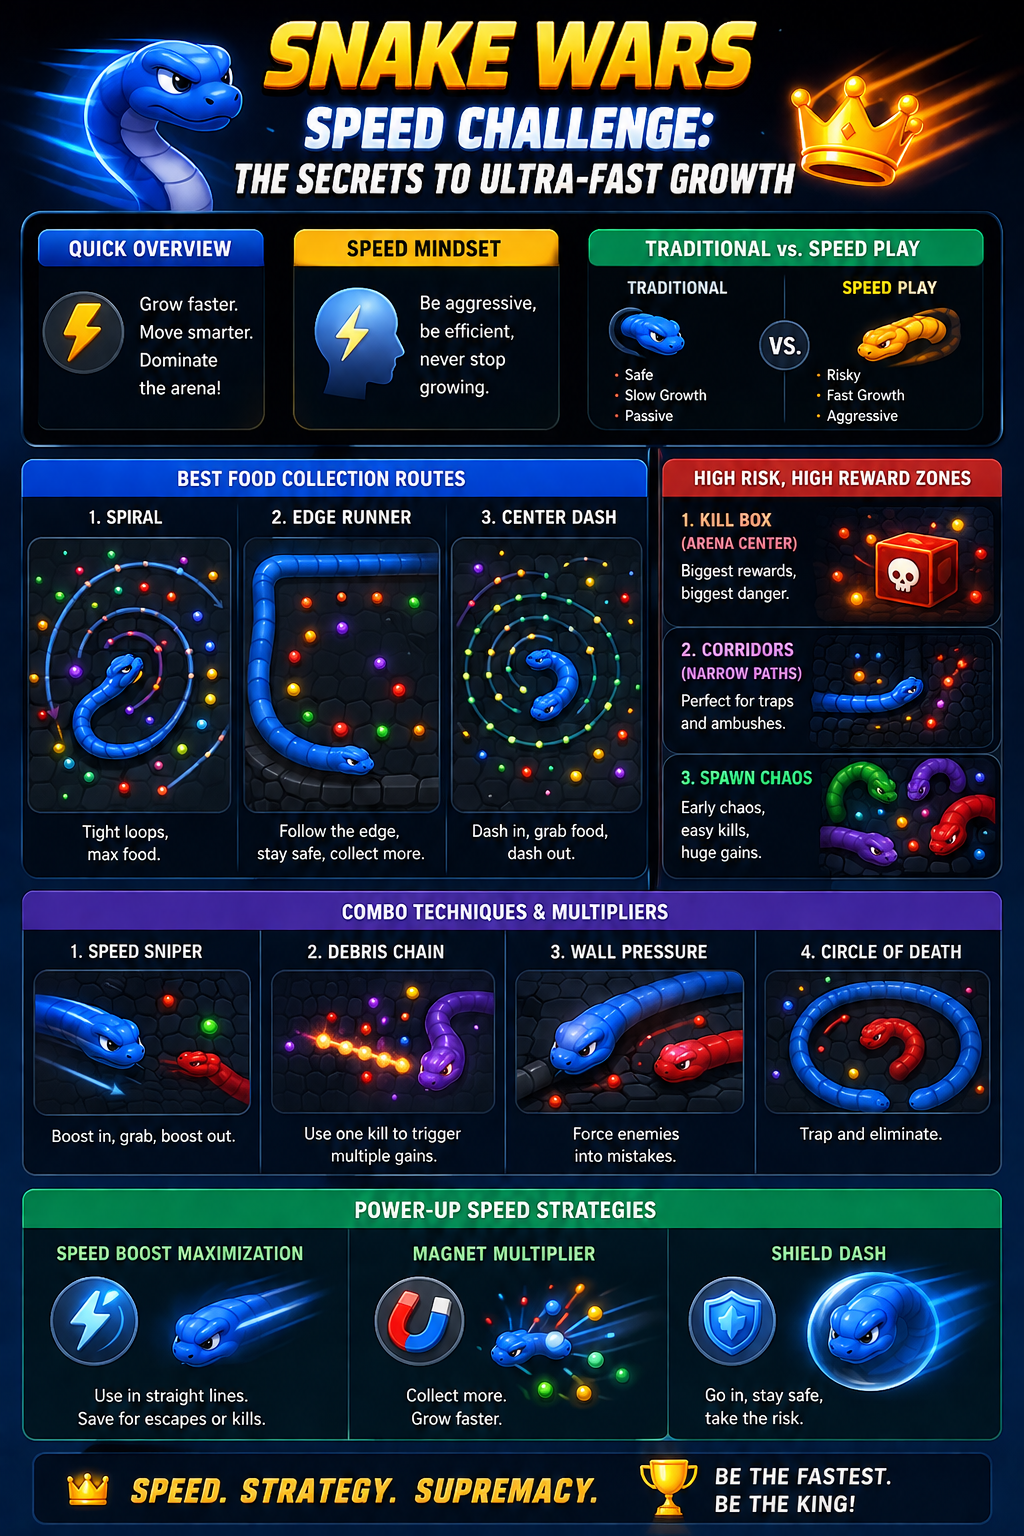
Quick Overview
- ⚡ Goal: Reach maximum size in minimum time
- 🎯 Strategy: Food efficiency + remain collection
- 💰 Risk: High risk, high reward gameplay
- 🏆 Reward: Dominate the leaderboard fast
The Speed Mindset
Traditional vs. Speed Play
Traditional Play:
- Focus: Survival and steady growth
- Risk tolerance: Low
- Growth rate: 1-2 segments per minute
- Time to 500 segments: 15-20 minutes
Speed Play:
- Focus: Maximum growth efficiency
- Risk tolerance: High
- Growth rate: 10-50 segments per minute
- Time to 500 segments: 5-8 minutes
Speed Play Philosophy:
"I'd rather die fighting for massive gains than survive with minimal growth."
Optimal Food Collection Routes
Route Type 1: The Spiral
Best for: Early game (0-100 segments) Risk Level: Low Growth Rate: 15-20 segments/minute
How to Execute:
- Start at any edge of the arena
- Move in a clockwise spiral pattern
- Stay 20% away from walls
- Collect all food in your path
- Gradually move toward center
Why It Works:
- Covers maximum ground efficiently
- Maintains escape routes
- Predictable pattern for smooth movement
- Low collision risk
Pro Tip: Use boost sparingly between food clusters to maintain spiral momentum.
Route Type 2: The Edge Runner
Best for: Early-mid game (50-200 segments) Risk Level: Medium Growth Rate: 25-35 segments/minute
How to Execute:
- Navigate along the arena perimeter
- Stay 10-15 segments away from the wall
- Collect food along the edge
- When reaching another snake, cut inward
- Return to edge after passing danger
Why It Works:
- Edges often have abundant food
- Fewer snakes to compete with
- Wall acts as one less collision direction
- Easy escape route inward
Pro Tip: Watch for snakes getting cut off at edges—collect their remains for massive boosts!
Route Type 3: The Center Rush
Best for: Mid game (150+ segments) Risk Level: High Growth Rate: 50-100 segments/minute
How to Execute:
- Build to 150+ segments safely
- Activate boost and head straight for center
- Target remains of crashed snakes immediately
- Create aggressive cut-off maneuvers
- Retreat to edges if outnumbered
Why It Works:
- Center has most snake activity
- Most crashes happen here
- Remain availability is highest
- Maximum growth potential
Pro Tip: Time your entry when a large snake just crashed—the remains are worth 50-100 segments!
High-Risk High-Reward Zones
Zone 1: The Kill Box (Center Arena)
Location: Dead center of the map Risk: Extreme (50%+ death rate) Reward: Massive (100+ segments in 30 seconds)
When to Enter:
- You have 200+ segments
- Multiple large snakes are battling
- You see a recent crash with remains
- You have a shield power-up
Entry Strategy:
- Approach from edge at full boost
- Target specific remains (don't wander)
- Collect and exit immediately
- Return to safer territory
Exit Strategy:
- Always know your escape route
- Be ready to boost out
- Don't get greedy—one collection run per entry
Zone 2: The Gauntlet (Narrow Passages)
Location: Between large snakes near walls Risk: Very High Reward: High (40-80 segments)
When to Enter:
- You're 150+ segments
- Large snakes are blocking passage
- You see trapped smaller snakes
- You have boost available
Strategy:
- Wait for a gap to open
- Boost through quickly
- Collect remains from crushed snakes
- Don't stop—keep moving
Pro Tip: The chaos of the gauntlet often creates chain reactions of crashes—position yourself to collect multiple remains!
Zone 3: The Spawn Point Chaos
Location: Areas where new snakes spawn Risk: Medium-High Reward: Medium (20-40 segments)
Why It's Valuable:
- New players often crash immediately
- Their remains are easy pickings
- Constant stream of new victims
- Less competition from large snakes
Strategy:
- Patrol spawn areas
- Watch for erratic movements
- Position to collect remains
- Move to next spawn point
Combo Tricks and Multipliers
Combo 1: The Boost-Snipe
Difficulty: Medium Reward: 30-50 segments in 5 seconds
How to Execute:
- Locate a smaller snake ahead
- Position to cut them off
- Wait until they're committed to a path
- Boost to intercept their path
- Collect remains immediately
- Boost away to safety
Why It Works:
- Sudden boost catches them off guard
- They can't react in time
- You control the engagement
- Quick in, quick out
Combo 2: The Remain Chain
Difficulty: Hard Reward: 100-200 segments in 15 seconds
How to Execute:
- Find an area with 3+ large snakes
- Wait for a crash to happen
- Immediately rush to collect remains
- While collecting, position for next crash
- Chain together 3-4 remain collections
- Exit when you grow 150+ segments
Why It Works:
- One crash often triggers others
- Large snake remains are incredibly valuable
- Chaos masks your presence
- Exponential growth potential
Critical Tip: Know your escape route before starting the chain!
Combo 3: The Wall Pin
Difficulty: Medium-Hard Reward: 40-80 segments
How to Execute:
- Chase a snake toward the wall
- Position your body to block their escape
- Force them into the wall
- If they crash into you, even better
- Collect all remains
- Look for next victim
Why It Works:
- Removes one escape direction
- Panic causes mistakes
- High success rate
- Works on most snakes
Combo 4: The Circle of Death
Difficulty: Very Hard Reward: 100-300 segments
How to Execute:
- Grow to 250+ segments
- Find a cluster of smaller snakes
- Gradually encircle them
- Tighten the circle over time
- Watch them panic and crash
- Collect everything
- Repeat in new area
Why It Works:
- Creates inescapable trap
- Multiple crashes guaranteed
- Massive remain payout
- Psychological dominance
Warning: Requires excellent control and awareness—easy to mess up!
Power-Up Speed Strategies
Speed Boost Maximization
Basic Usage:
- Use boost to reach food 30% faster
- Cost: 1 segment per second
- Net gain: Positive if reaching 2+ food per second
Advanced Usage:
- Collect speed boost power-up
- Plan a route with dense food
- Activate boost and clear the area
- Collect remains from anyone you crash
- Deactivate before burning too much length
Pro Tip: Boost + remain collection = fastest growth in the game!
Magnet Multiplier
Basic Effect: Attracts food from 2x distance Duration: 10-15 seconds Optimal Use: In food-dense areas
Speed Strategy:
- Enter area with 20+ food pieces
- Activate magnet
- Move in efficient pattern
- Collect everything without precise navigation
- 2-3x normal collection rate
Combo Potential: Magnet + boost = insane food collection speed!
Shield Rush
Basic Effect: One collision immunity Duration: 5-10 seconds Optimal Use: Entering dangerous zones
Speed Strategy:
- Find a shield power-up
- Head straight for center or dangerous area
- Use shield to survive one mistake
- Collect remains aggressively
- Escape before shield expires
Pro Tip: Shield lets you take risks you normally couldn't—use for remain collection in dangerous zones!
Timing-Based Growth Hacks
The Spawn Wave
Pattern: New snakes spawn in waves every 30-45 seconds Opportunity: Spawn points have easy food + crashes
Strategy:
- Note spawn locations
- Position near spawn point before wave
- Collect food as they appear
- Wait for inevitable crashes
- Collect remains
- Move to next spawn point
Growth Potential: 50-100 segments per spawn wave
The Post-Crash Window
Pattern: After a large snake crashes, there's a 10-15 second chaos period Opportunity: Chain reaction crashes
Strategy:
- Watch for large snake crashes
- Wait 2-3 seconds for secondary crashes
- Rush in during the chaos
- Collect multiple remain piles
- Escape before order returns
Growth Potential: 150-300 segments in one entry
The Power-Up Spawn Cycle
Pattern: Power-ups spawn every 60-90 seconds in set locations Opportunity: Plan routes around power-ups
Strategy:
- Learn power-up spawn locations
- Time your route to arrive as they spawn
- Collect and use immediately
- Adjust route based on power-up type
- Repeat the cycle
Growth Potential: 20-40% faster growth with proper timing
Advanced Speed Techniques
The Remain Prediction
Concept: Predict where snakes will crash and position there
How to Learn:
- Watch snake movement patterns
- Identify aggressive vs. passive snakes
- Predict collision points
- Position to collect remains
- React quickly when crash happens
Success Rate: 60-80% with practice
The Body Split Tech
Advanced Move: Use your length to create two threats
How to Execute:
- Grow to 300+ segments
- Position your body in a V-shape
- Create two apparent threats
- Force enemies to choose
- Collect remains from either outcome
Why It Works:
- Creates impossible decisions
- Enemies often panic
- High crash rate
- You collect either way
The Boost Feint
Psychological Play: Fake a boost to trigger reactions
How to Execute:
- Approach a smaller snake
- Make a motion like you're about to boost
- Watch their reaction
- If they flee, cut off their escape
- If they hold, boost past them
- Adapt based on their response
Why It Works:
- Forces enemies to reveal strategy
- You control the engagement
- Higher success rate than blind attacks
Risk Management for Speed Players
The 30% Rule
Rule: Never risk more than 30% of your length on one maneuver
Examples:
- At 100 segments, don't risk dying for 30 segments
- At 500 segments, don't risk dying for 150 segments
- Always consider the risk/reward ratio
Exception: When you can reach 200+ segments from remains
The Exit Strategy
Before Any Risky Move:
- Identify your escape route
- Check for obstacles
- Confirm no snakes blocking your path
- Plan your exit boost
- Execute the move
- Exit immediately if it goes wrong
Remember: A speed player who dies often grows slower than a steady player!
Speed Run Records to Beat
Beginner Targets
- 100 segments: Under 2 minutes
- 250 segments: Under 5 minutes
- 500 segments: Under 10 minutes
Intermediate Targets
- 100 segments: Under 1 minute
- 250 segments: Under 3 minutes
- 500 segments: Under 7 minutes
Advanced Targets
- 100 segments: Under 45 seconds
- 250 segments: Under 2 minutes
- 500 segments: Under 5 minutes
Elite Targets
- 100 segments: Under 30 seconds
- 250 segments: Under 90 seconds
- 500 segments: Under 4 minutes
Training Drills
Drill 1: Food Collection Speed
Goal: Collect 50 food in 60 seconds Focus: Efficient movement patterns Repeat until: Consistently under 45 seconds
Drill 2: Remain Reaction
Goal: Collect remains within 3 seconds of crash Focus: Quick reaction and positioning Repeat until: 90% success rate
Drill 3: Center Raid
Goal: Enter center, collect remains, exit in 20 seconds Focus: Quick decision-making Repeat until: 5 successful runs without death
Drill 4: Combo Chain
Goal: Collect remains from 3 different crashes in one run Focus: Positioning and awareness Repeat until: Successful 70% of attempts
Common Speed Player Mistakes
❌ Mistake 1: Greed Over Safety
Problem: Staying too long in dangerous zones
Solution: Set a target (e.g., 100 segments) and leave immediately after reaching it
❌ Mistake 2: Ignoring Escape Routes
Problem: Focusing only on growth, not survival
Solution: Always know where you'll exit before entering danger
❌ Mistake 3: Chasing Small Gains
Problem: Going for 10-segment gains when 100-segment opportunities exist
Solution: Always prioritize larger remain collections over small food
❌ Mistake 4: Poor Boost Management
Problem: Boosting when not needed, burning length
Solution: Only boost for high-value targets or escapes
❌ Mistake 5: Tunnel Vision
Problem: Focusing on one target and missing bigger opportunities
Solution: Scan constantly for better opportunities even while collecting
Speed Play Checklist
Before each speed run:
- Check mini-map for activity zones
- Identify initial route (spiral/edge/center)
- Note power-up locations
- Set growth target for this run
- Identify escape routes from danger zones
- Ready boost for quick movements
During speed run:
- Maintain movement efficiency
- Prioritize remains over food
- Watch for crash opportunities
- Don't get greedy
- Exit when target reached
After speed run:
- Analyze what worked
- Identify mistakes
- Adjust strategy for next run
- Track time to target size
Ready for the Speed Challenge?
Now you have the knowledge to grow at lightning speed! Remember:
⚡ Speed requires calculated risks 🎯 Focus on high-value opportunities 💰 Prioritize remains over food 🏆 Know when to push and when to play safe 🔄 Learn from every death
Frequently Asked Questions
Q: Is speed play worth the high death rate? A: Yes—if you execute well, you'll reach maximum size 3-5x faster than traditional play, even accounting for deaths.
Q: What's the single most important speed tip? A: Prioritize collecting remains from crashed snakes over everything else. One large snake remains = 5-10 minutes of food collection.
Q: How do I know when I'm ready for speed play? A: Consistently reach 200+ segments in traditional play, then start incorporating speed elements gradually.
Q: What's the biggest mistake speed players make? A: Getting greedy and staying in danger too long. Set targets and stick to them!
Q: Can speed play work in competitive matches? A: Absolutely—speed players often dominate leaderboards because they reach huge sizes before others have grown at all.
Go forth and grow fast! ⚡🐍